REST APIs are a common way to implement communication between an app and a server.
In this tutorial, I show you how I structure my Flutter apps in a simple, yet scalable way to retrieve and send
data from/to a server and display it in the app.
The source code for this tutorial can be found on
GitHub: https://github.com/bettercoding-dev/flutter-rest-api-architecture.
Architecture
We will use MVVM (Model-View-ViewModel) as the foundation of our app.
The model describes the data that we are using and should be displayed in our app.
In our example it will be users that have a name, email address and a avatar.
The view refers to the UI that displays the data. In Flutter these are our widgets.
The view model contains the logic of our app. For this tutorial, this will be a riverpod Notifier that holds and
handles state changes.
Additionally, we will implement a repository layer (or data layer) that is responsible for fetching data for a
source. We are going to add abstraction here to easily switch between different sources.
Required Packages
For this tutorial, I will add the following packages to my app:
- riverpod: a powerful state management and dependency injection solution
- freezed: generates utility functions for data classes
- retrofit: generates REST API client functions
- json_serializable: generates
fromJson and toJson functions - dio: a Dart http client
You can use this command to install all the dependencies:
flutter pub add flutter_riverpod riverpod_annotation freezed_annotation json_annotation retrofit dio dev:riverpod_generator dev:build_runner dev:custom_lint dev:riverpod_lint dev:freezed dev:json_serializable dev:retrofit_generator
Afterward, your dependencies should look something like this:
 1
 2
 3
 4
 5
 6
 7
 8
 9
10
11
12
13
14
15
16
17
18
19
20
| dependencies:
flutter:
sdk: flutter
flutter_riverpod: ^2.5.1
freezed_annotation: ^2.4.4
json_annotation: ^4.9.0
retrofit: ^4.4.1
riverpod_annotation: ^2.3.5
dev_dependencies:
flutter_test:
sdk: flutter
flutter_lints: ^4.0.0
riverpod_generator: ^2.4.3
build_runner: ^2.4.12
custom_lint: ^0.6.7
riverpod_lint: ^2.3.13
freezed: ^2.5.7
json_serializable: ^6.8.0
retrofit_generator: ^9.1.2
|
The User Model
Let’s start with modeling our model. We are going to use the free Reqres API to fetch a list of
users. A user is specified like this:
1
2
3
4
5
6
7
| {
"id": 2,
"email": "janet.weaver@reqres.in",
"first_name": "Janet",
"last_name": "Weaver",
"avatar": "https://reqres.in/img/faces/2-image.jpg"
}
|
We use this information to derive a User class that contains this data.
Using freezed and json_serializable we generate useful functions such as copyWith and toJson;
1
2
3
4
5
6
7
8
9
10
11
12
13
14
15
16
17
18
19
| import 'package:flutter/foundation.dart';
import 'package:freezed_annotation/freezed_annotation.dart';
part 'user.freezed.dart';
part 'user.g.dart';
@freezed
class User with _$User {
const factory User({
required int id,
required String email,
@JsonKey(name: 'first_name') required String firstName,
@JsonKey(name: 'last_name') required String lastName,
required String avatar,
}) = _User;
factory User.fromJson(Map<String, dynamic> json) => _$UserFromJson(json);
}
|
Let’s start the build_runner to generate the required files.
dart run build_runner watch --delete-conflicting-outputs
The Repository Layer
Next, we define our repository layer. Here we will create an abstraction for being able to switch between
different data
sources as needed.
In this example, we will create an interface UserRepository defining the functions of the repository and
create two concrete implementations:
MockUserRepository is going to be a mock implementation. This can be used to quickly test your implementation,
or
start working even though the API might not be yet ready to be used.ApiUserRepository is going to be the actual implementation using the API Client generated with retrofit.
The UserRepository interface
We use the interface class to define which functions the implementations should have.
To keep this tutorial short, we will focus on a single function:
1
2
3
4
5
| import 'package:src/user/model/user.dart';
abstract interface class UserRepository {
Future<List<User>> getAllUsers();
}
|
The MockUserRepository
Before actually implementing API calls, let’s create a mock repository first.
This way we can start working on the rest of the app before actually needing access to the API.
In many projects, APIs might not be available in the early stages of the project, this way you can still start working.
1
2
3
4
5
6
7
8
9
10
11
12
13
14
15
16
17
18
19
20
21
22
23
24
25
26
27
28
| import 'package:src/user/model/user.dart';
import 'package:src/user/repository/user_repository.dart';
class MockUserRepository implements UserRepository {
static const _mockUsers = [
User(
id: 1,
email: 'Tim@testmail.com',
firstName: 'Tim',
lastName: 'Tester',
avatar: 'https://reqres.in/img/faces/1-image.jpg',
),
User(
id: 2,
email: 'toby@testmail.com',
firstName: 'Toby',
lastName: 'Tester',
avatar: 'https://reqres.in/img/faces/2-image.jpg',
),
];
@override
Future<List<User>> getAllUsers() async {
// add delay to mimic an api call
await Future.delayed(const Duration(milliseconds: 300));
return _mockUsers;
}
}
|
Back in the file of the UserRepository, create a riverpod provider returning the MockUserRepository.
1
2
3
4
5
6
7
8
9
10
11
12
| import 'package:riverpod_annotation/riverpod_annotation.dart';
import 'package:src/user/model/user.dart';
import 'package:src/user/repository/mock_user_repository.dart';
part 'user_repository.g.dart';
@riverpod
UserRepository userRepository(ref) => MockUserRepository();
abstract interface class UserRepository {
Future<List<User>> getAllUsers();
}
|
At this point, we can define which implementation of UserRepository is made available for this provider.
The UserController
Now, we implement the ViewModel layer of the app. We are going to create a UserController class which is a
riverpod Notifier.
1
2
3
4
5
6
7
8
9
10
11
12
13
14
| import 'package:riverpod_annotation/riverpod_annotation.dart';
import 'package:src/user/model/user.dart';
import 'package:src/user/repository/user_repository.dart';
part 'user_controller.g.dart';
@riverpod
class UserController extends _$UserController {
@override
Future<List<User>> build() async {
final userRepository = ref.watch(userRepositoryProvider);
return userRepository.getAllUsers();
}
}
|
As you can see, the implementation is quite simple.
In line 11 we use the riverpod ref.watch function to retrieve our user repository instance.
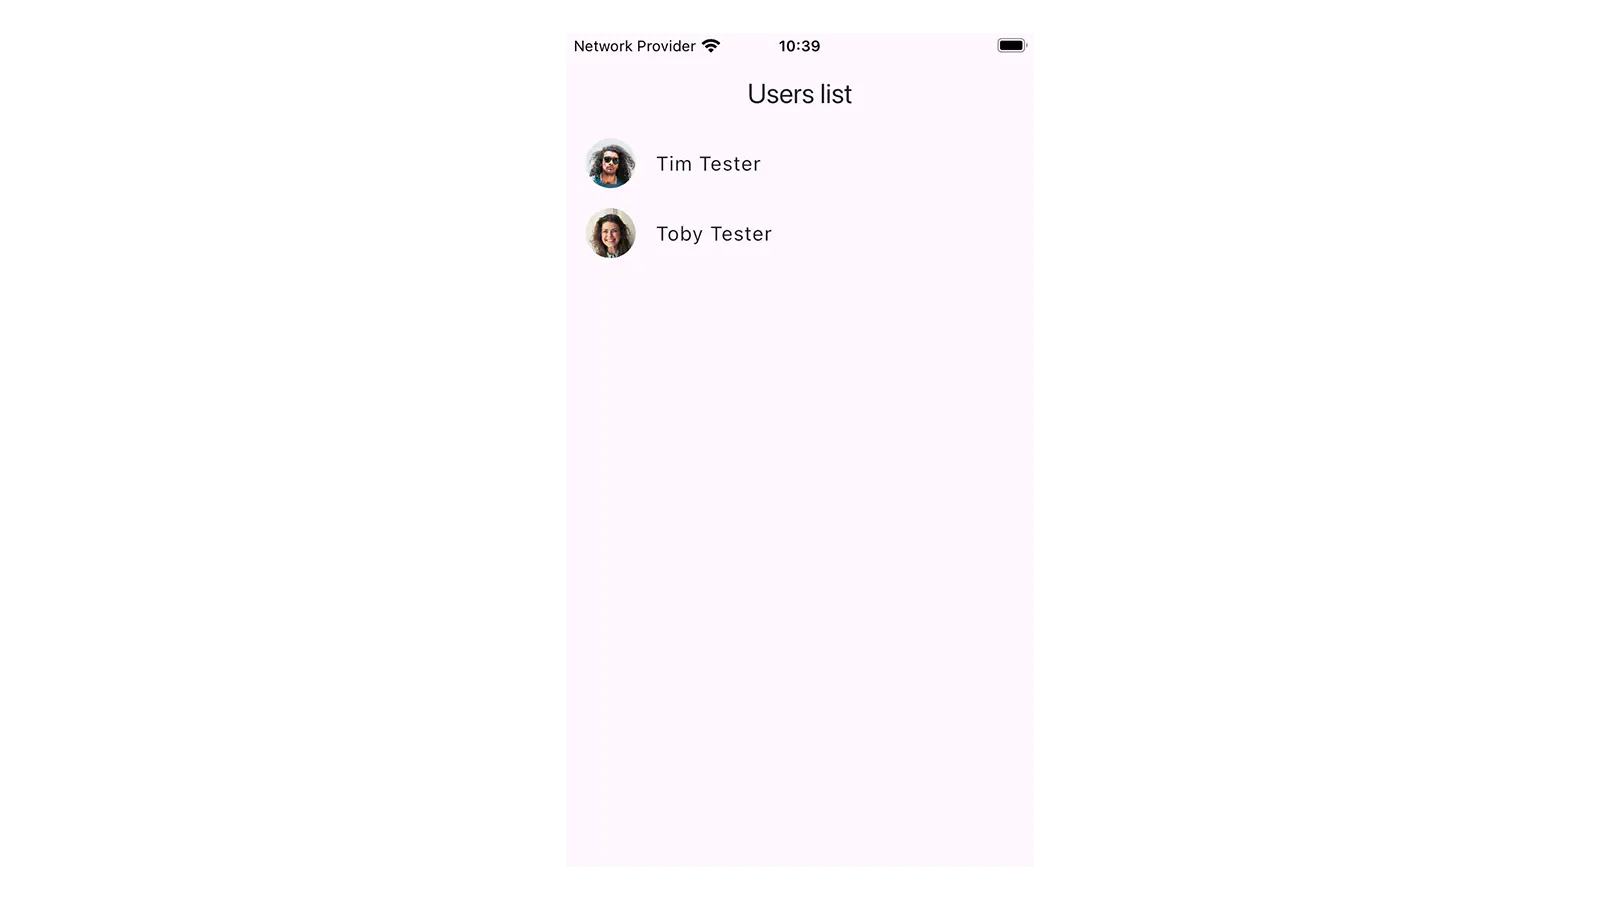
Since we defined it to be a MockUserRepository we will be getting mock users from the repository.
Notice that the controller itself has no knowledge which implementation is used. We can later swap the mock
implementation with an api implementation without needing to touch the controller again.
The UI
Let’s create new page for our application and name it UserListPage.
1
2
3
4
5
6
7
8
9
10
11
12
13
14
15
16
17
18
19
20
21
22
23
24
25
26
27
28
29
30
31
32
33
34
35
36
37
38
39
40
41
| import 'package:flutter/material.dart';
import 'package:flutter_riverpod/flutter_riverpod.dart';
import 'package:src/user/state/user_controller.dart';
class UserListPage extends ConsumerWidget {
const UserListPage({super.key});
@override
Widget build(BuildContext context, WidgetRef ref) {
final state = ref.watch(userControllerProvider);
return Scaffold(
appBar: AppBar(
title: const Text('Users list'),
),
body: state.when(
loading: () =>
const Center(
child: CircularProgressIndicator(),
),
error: (error, trace) =>
Center(
child: Text('Error: $error'),
),
data: (users) =>
ListView.builder(
itemCount: users.length,
itemBuilder: (context, index) {
final user = users[index];
return ListTile(
leading: CircleAvatar(
backgroundImage: NetworkImage(user.avatar),
),
title: Text('${user.firstName} ${user.lastName}'),
);
},
),
),
);
}
}
|
Extending the ConsumerWidget class gives us access to riverpod’s WidgetRef that we use to watch the
UserController state.
We handle loading and error state and render the list of users and some of their attributes.s
To make riverpod work, we need to wrap our App widget with a ProviderScope.
Finally, we set the UserListPage as the home attribute of the MaterialApp widget.
1
2
3
4
5
6
7
8
9
10
11
12
13
14
15
16
17
18
19
20
21
22
23
| import 'package:flutter/material.dart';
import 'package:flutter_riverpod/flutter_riverpod.dart';
import 'package:src/user/ui/user_list_page.dart';
void main() {
runApp(
const ProviderScope(
child: MainApp(),
),
);
}
class MainApp extends StatelessWidget {
const MainApp({super.key});
@override
Widget build(BuildContext context) {
return const MaterialApp(
debugShowCheckedModeBanner: false,
home: UserListPage(),
);
}
}
|
Now, we can start the app and examine our list of users.
API connection using retrofit
Now that we’re able to display the list of users in our app, let’s add the API connection.
The API response
A full sample response of our api looks like this:
1
2
3
4
5
6
7
8
9
10
11
12
13
14
15
16
17
18
19
20
21
22
23
24
25
26
27
28
29
30
31
32
33
34
35
36
37
38
39
40
41
42
43
44
45
46
47
48
49
50
51
52
53
54
| {
"page": 1,
"per_page": 6,
"total": 12,
"total_pages": 2,
"data": [
{
"id": 1,
"email": "george.bluth@reqres.in",
"first_name": "George",
"last_name": "Bluth",
"avatar": "https://reqres.in/img/faces/1-image.jpg"
},
{
  "id": 2,
  "email": "janet.weaver@reqres.in",
  "first_name": "Janet",
  "last_name": "Weaver",
  "avatar": "https://reqres.in/img/faces/2-image.jpg"
},
{
"id": 3,
"email": "emma.wong@reqres.in",
"first_name": "Emma",
"last_name": "Wong",
"avatar": "https://reqres.in/img/faces/3-image.jpg"
},
{
"id": 4,
"email": "eve.holt@reqres.in",
"first_name": "Eve",
"last_name": "Holt",
"avatar": "https://reqres.in/img/faces/4-image.jpg"
},
{
"id": 5,
"email": "charles.morris@reqres.in",
"first_name": "Charles",
"last_name": "Morris",
"avatar": "https://reqres.in/img/faces/5-image.jpg"
},
{
"id": 6,
"email": "tracey.ramos@reqres.in",
"first_name": "Tracey",
"last_name": "Ramos",
"avatar": "https://reqres.in/img/faces/6-image.jpg"
}
],
"support": {
"url": "https://reqres.in/#support-heading",
"text": "To keep ReqRes free, contributions towards server costs are appreciated!"
}
}
|
We can see that the data attribute contains a list of User objects that we created earlier.
To correctly parse the response, we create another model called UserListResponse.
To simplify the model, we ignore all attributes that we don’t use in the app.
1
2
3
4
5
6
7
8
9
10
11
12
13
14
15
16
17
| import 'package:flutter/foundation.dart';
import 'package:freezed_annotation/freezed_annotation.dart';
import 'package:src/user/model/user.dart';
part 'user_list_response.freezed.dart';
part 'user_list_response.g.dart';
@freezed
class UserListResponse with _$UserListResponse {
const factory UserListResponse({
required List<User> data,
}) = _UserListResponse;
factory UserListResponse.fromJson(Map<String, dynamic> json) =>
_$UserListResponseFromJson(json);
}
|
The UserApiClient
For the base configuration of our API we’re required to create an instance of the Dio class.
Let’s create a provider for that.
1
2
3
4
5
6
7
8
9
10
11
| import 'package:dio/dio.dart';
import 'package:riverpod_annotation/riverpod_annotation.dart';
part 'global_providers.g.dart';
@riverpod
Dio dio(DioRef ref) =>
Dio()
..options = BaseOptions(
baseUrl: 'https://reqres.in/api',
);
|
Now that we have our response model, we create a class called UserApiClient which uses the retrofit package to
generate our API calls.
 1
 2
 3
 4
 5
 6
 7
 8
 9
10
11
12
13
14
15
16
17
18
19
20
21
| import 'package:dio/dio.dart';
import 'package:retrofit/retrofit.dart';
import 'package:riverpod_annotation/riverpod_annotation.dart';
import 'package:src/global_providers.dart';
import 'package:src/user/client/user_list_response.dart';
part 'user_api_client.g.dart';
@riverpod
UserApiClient userApiClient(UserApiClientRef ref) =>
UserApiClient(
ref.watch(dioProvider),
);
@RestApi()
abstract class UserApiClient {
factory UserApiClient(Dio dio) = _UserApiClient;
@GET('/users')
Future<UserListResponse> getUserList();
}
|
Notice, that we also created a riverpod provider for accessing an instance of UserApiClient.
The UserApiRepository
Finally, we create a ApiUserRepository that uses the UserApiClient to fetch some data from the API.
1
2
3
4
5
6
7
8
9
10
11
12
13
14
15
16
17
18
19
20
21
22
| import 'dart:developer';
import 'package:src/user/client/user_api_client.dart';
import 'package:src/user/model/user.dart';
import 'package:src/user/repository/user_repository.dart';
class ApiUserRepository implements UserRepository {
final UserApiClient client;
const ApiUserRepository(this.client);
@override
Future<List<User>> getAllUsers() async {
try {
final response = await client.getUserList();
return response.data;
} catch (error, trace) {
log('could not fetch users', error: error, stackTrace: trace);
rethrow;
}
}
}
|
As a last step, we need to replace the MockUserRepository with the newly created ApiUserRepository in the provider.
 1
 2
 3
 4
 5
 6
 7
 8
 9
10
11
12
13
14
15
16
| import 'package:riverpod_annotation/riverpod_annotation.dart';
import 'package:src/user/client/user_api_client.dart';
import 'package:src/user/model/user.dart';
import 'package:src/user/repository/api_user_repository.dart';
part 'user_repository.g.dart';
@riverpod
UserRepository userRepository(ref) =>
ApiUserRepository(
ref.watch(userApiClientProvider),
);
abstract interface class UserRepository {
Future<List<User>> getAllUsers();
}
|
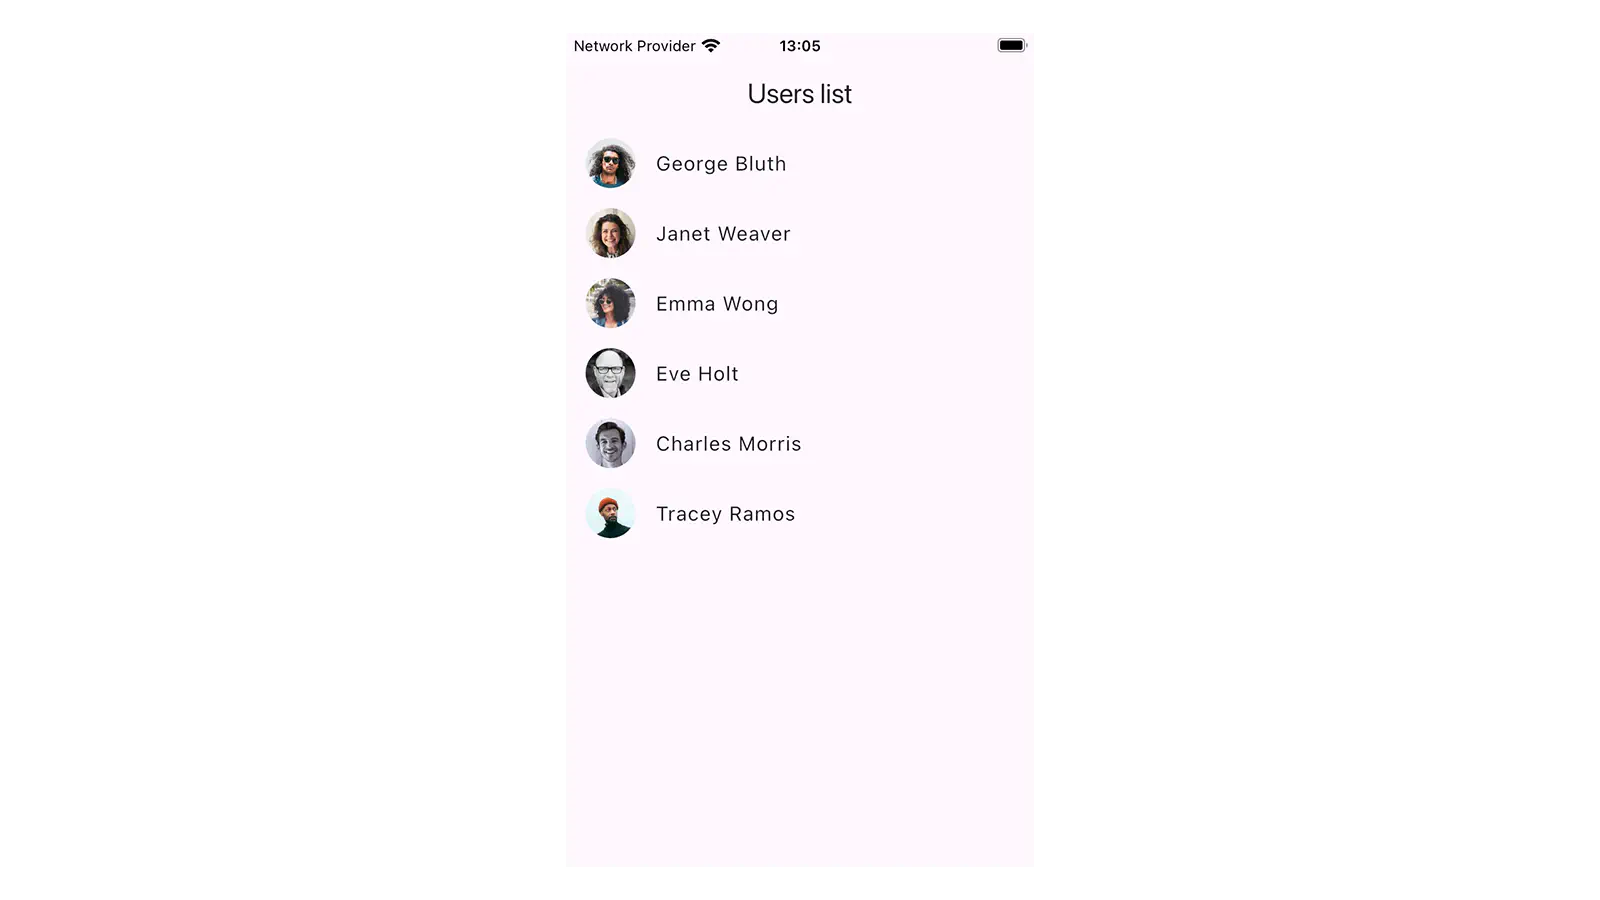
As we refresh our app, we can now see that mock users have been replaced by actual users from the API.
Take away
In this tutorial, you’ve learned how to structure your app to fetch data from an API and display it in your app.
We used abstraction in the repository layer to be able to replace a mock implementation with the API implementation
later in the development process.
I’ve used this basic structure in many different projects from a couple of hundreds to tens of thousands of lines of
code.